
Horn Baffles
DESIGNED BY T. GESUALDO
We now have available the Horn Level 1(HL1) baffles, which add an adjustable labyrinth horn lens to the original OG baffles with the 15″ coaxial. Moving the tweeters from the 15s allows for different room dispersion and more realism in the tone, and sound-stage.
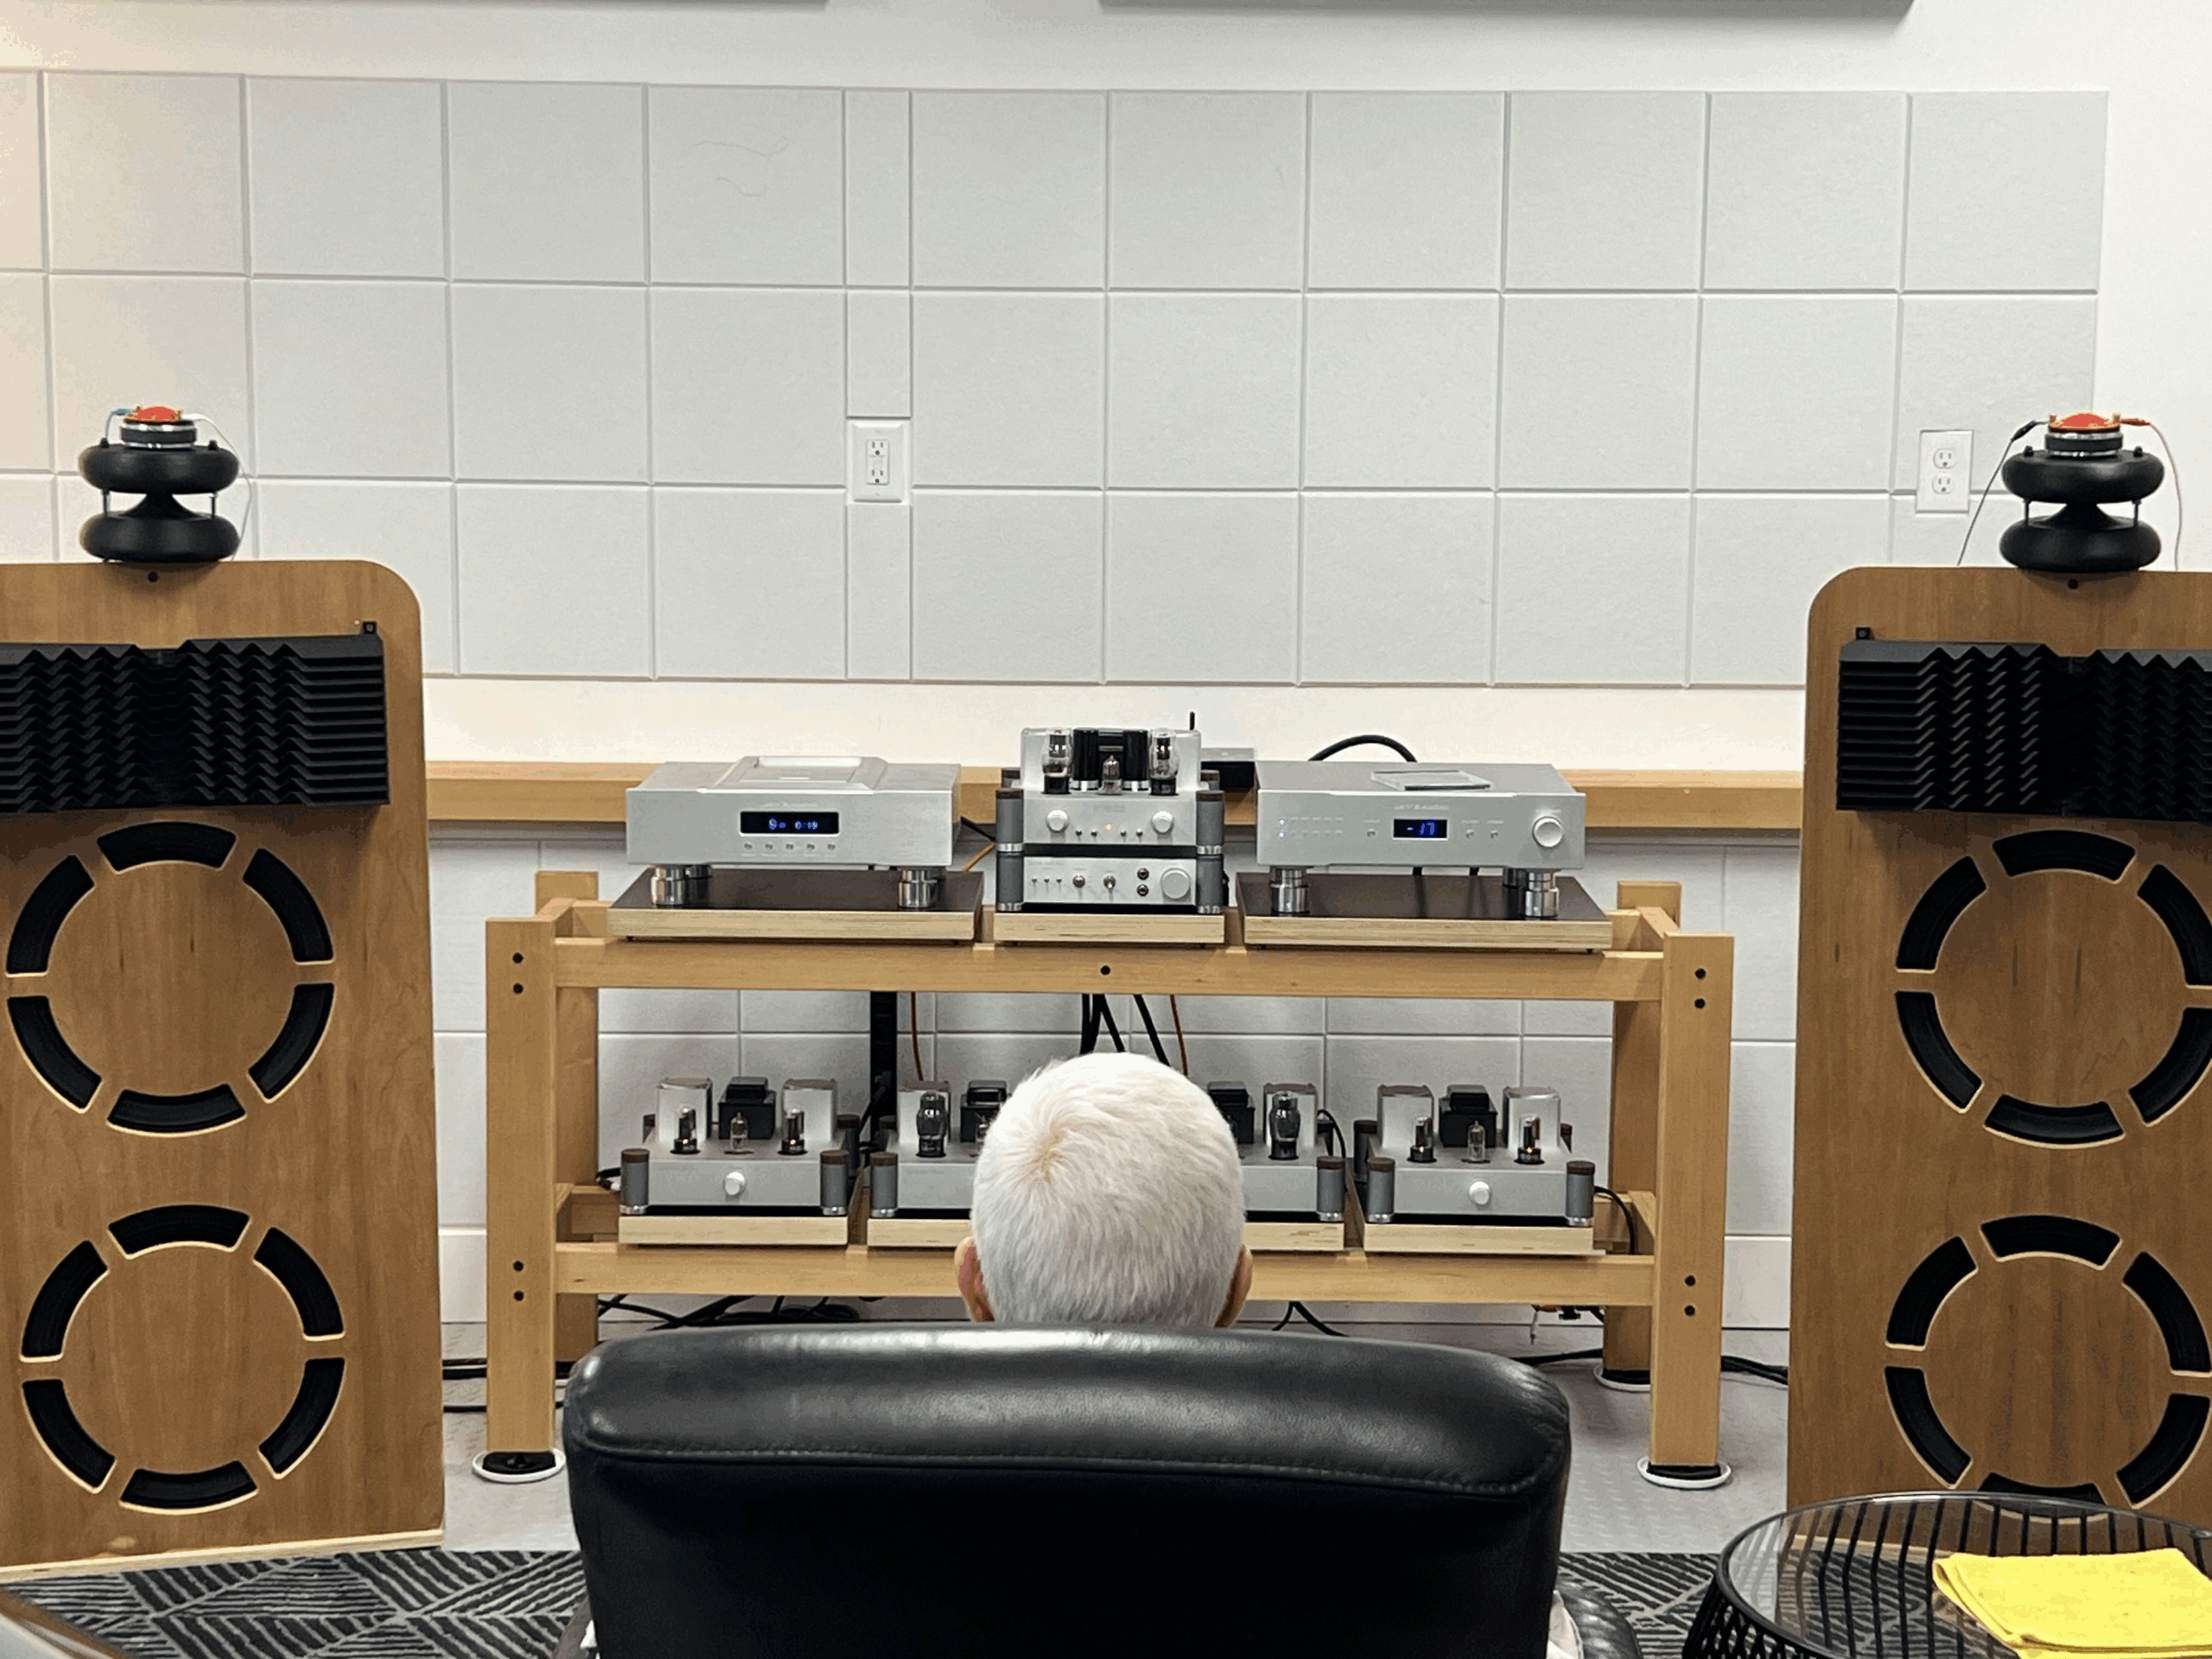
We also have now finished as you can see in the photo next to this text the new Level 2 baffles, with an exponential horn and labyrinth lens, as well as the 360 degree tweeter, along with two 18″ drivers per baffle. These baffles are big, but are also 103dbs w/m sensitive. These were designed specifically for our tube amplifiers. For what they do they are really much smaller than speakers at this level of both sensitivity and performance. These speakers aren’t about anything but the best performance we could design, they are meant to be a no compromise product.
This speaker design, the Horn Level 2 (HL2), are La Dolce Audio’s uncompromising, and unshackled from corporate pressure and commercial needs approach to Hifi. Yet in a practical way because they are smaller than horn loudspeakers working like they do. Most high sensitivity horn speakers with this sort of room dispersion with this wide of bandwidth in a mid-horn are very large. They were designed to work with our current-drive, single ended pentode low watt vacuum tube amplifiers, and the UA2.5v2 and UA2.5m amplifiers were made using these speakers. At this point this is the best of what we can and have designed. We sincerely hope there is better somewhere, because we aren’t done chasing our dream of making the best possible for the least cost.
Soon to come will be the Horn Level 3 Baffles, they may not sound better but one thing we do know is you have not seen anything like them.
Horn Level 1
The plans
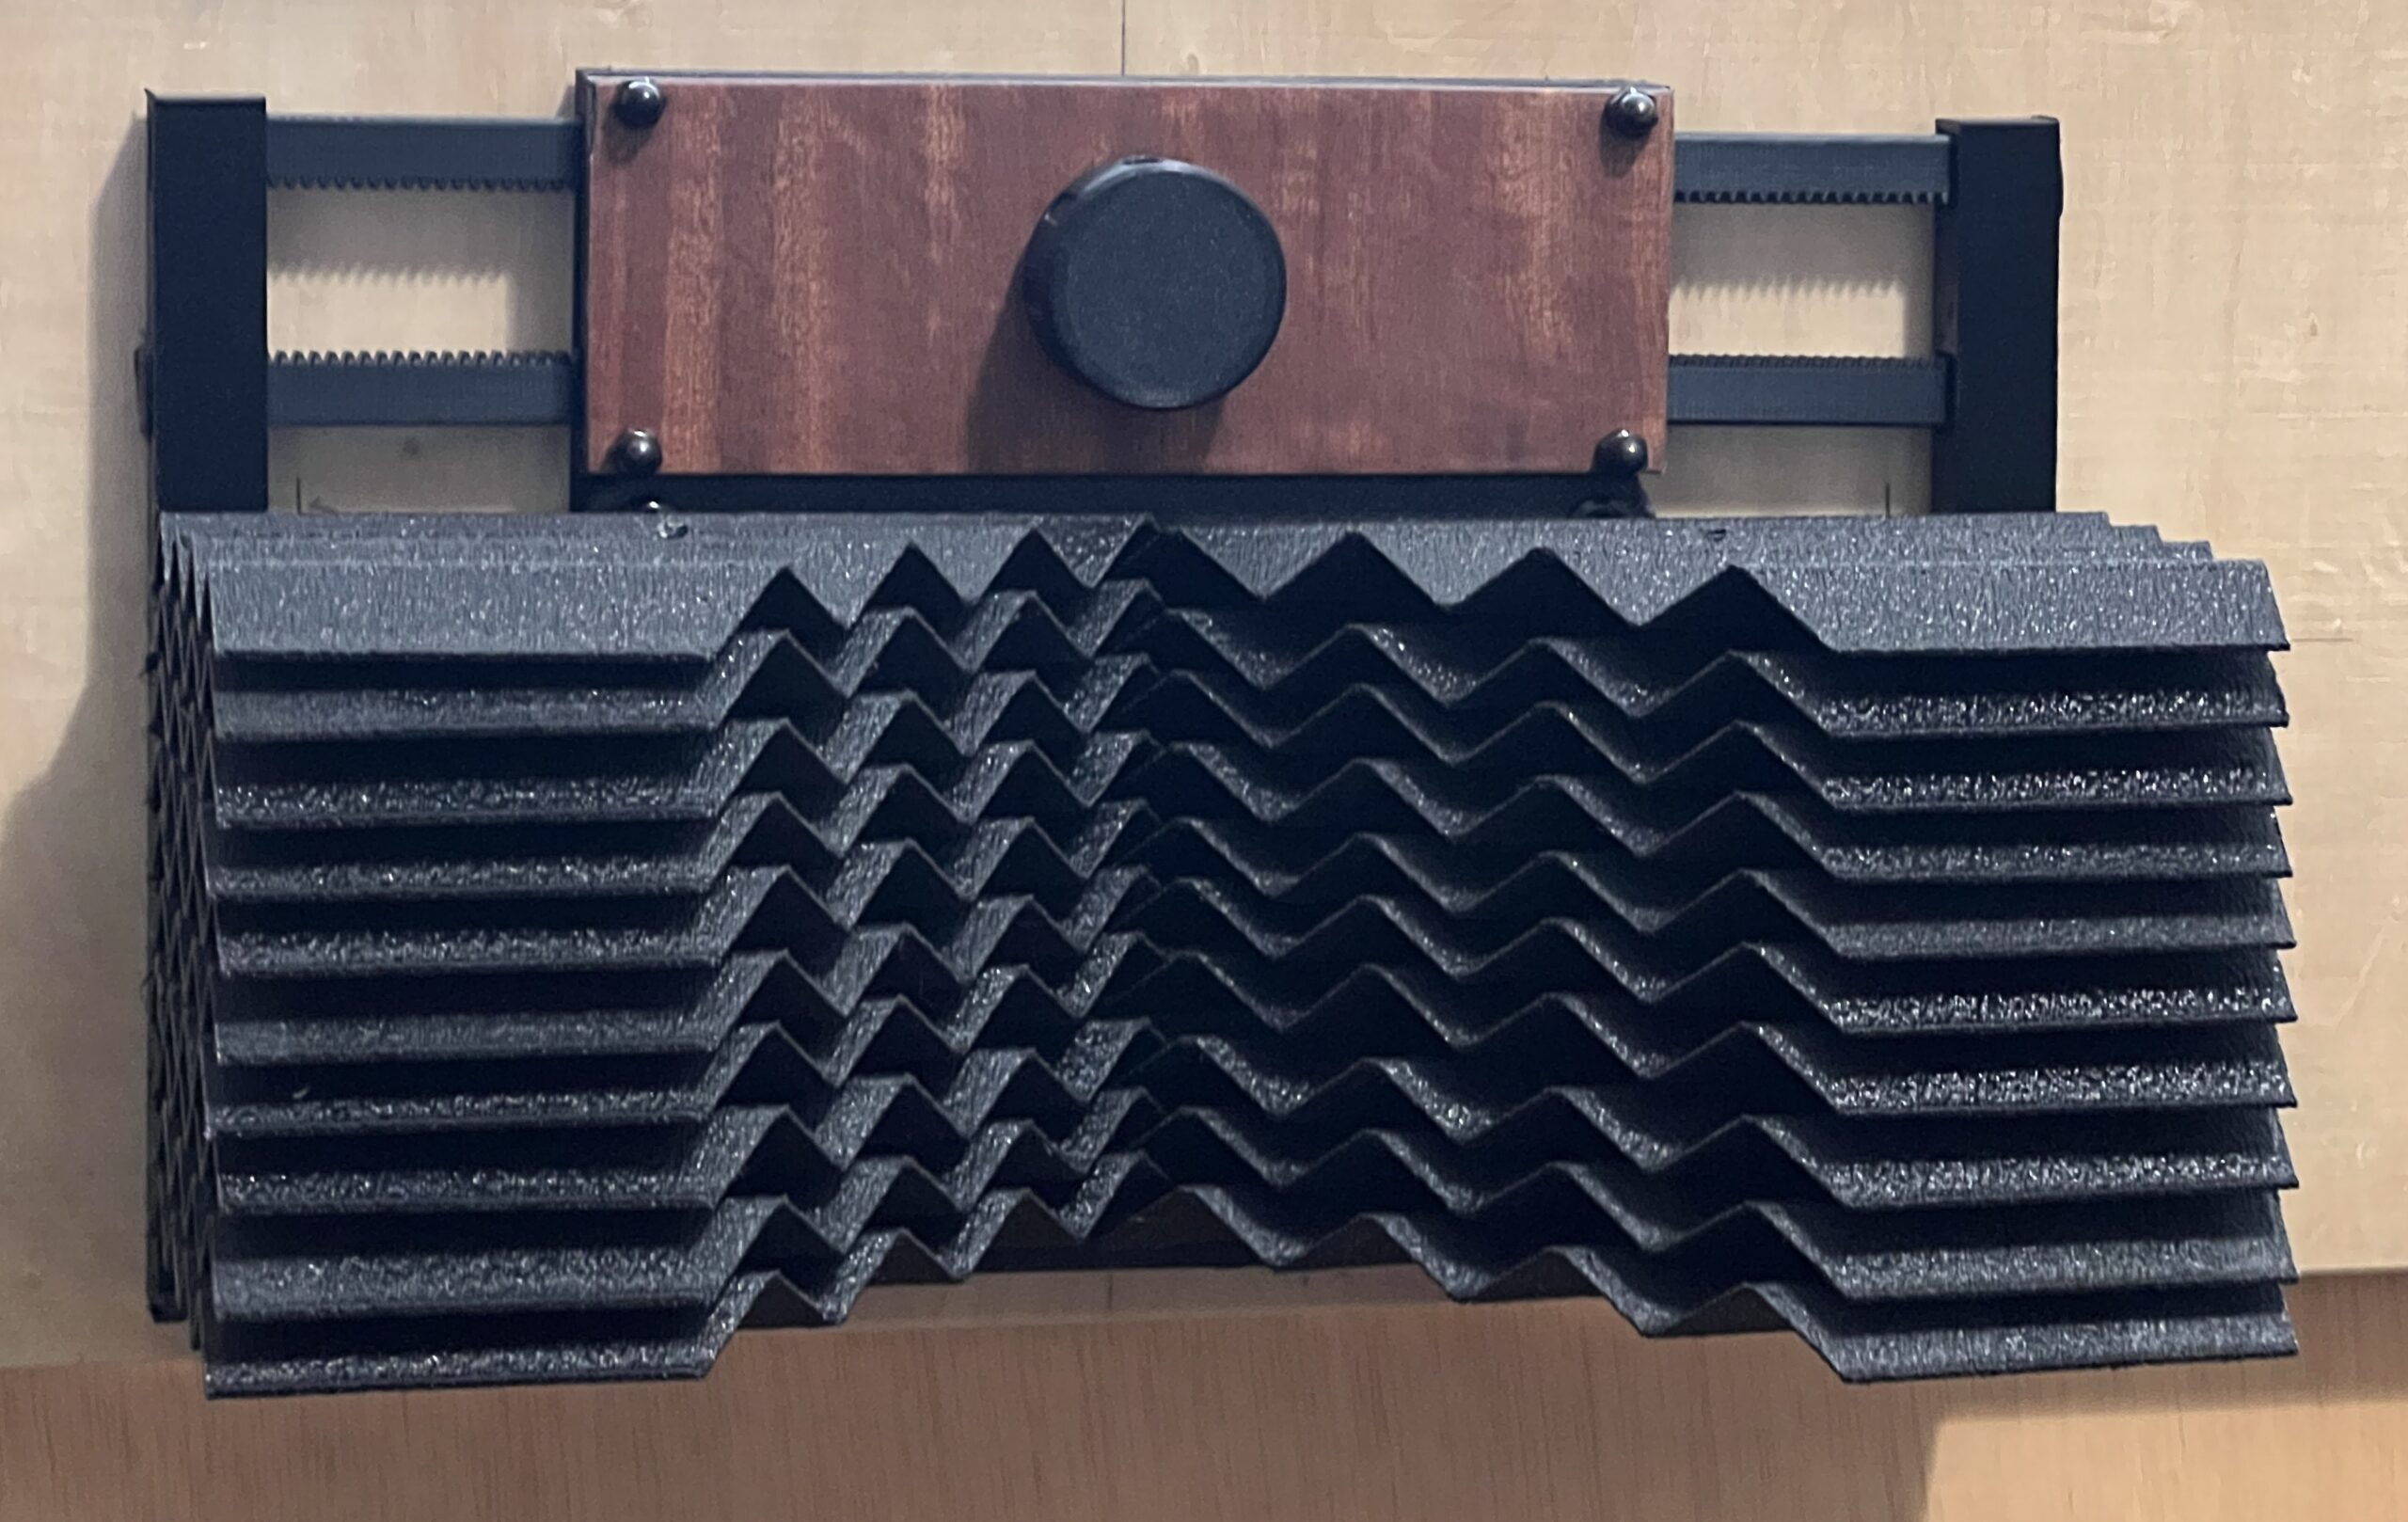
These are the plans for the Horn Level 1 baffles (HL1). Show is the expanded baffle height so that you can mount the HL1 horn to the baffle. Although there is enhanced soundstage and imaging if the back of the lens is open, not mounted on a baffle, as the sound wraps around behind the lens and horn. (The plans, to the right, the drivers are not to scale but there to simply show the positioning.)
The lens is adjustable with a knob, when the lens is closer and overlaped the soundstage widens and images are less focused but sill very much located in the soundstage. When you spread the lens out the more focused the images become, and when the lens banks are not covering the horn you still get some widening of the sound stage compared to no lens at all, but there is maximum focus to the images. How deep your soundstage is, and how layered the images are along with issolated like holographic sonic images, are all more a product of the amplifier you use.

Components
For Horn Level 1.
Here are all the components used to create the Horn Level 1 (HL1) Baffles. If you have any questions feel free to join us on the La Dolce Audio channel on the ABX Discord community, or email tadgesualdo@gmail.com.
These horns utilize the small 1″ tweeters that fit into our coaxial drivers. The HL1 Baffles are intended to upgrade the original 15″ coaxials into a horn based baffles taking the horn driver out of the coaxial into an ideal load with flexible turning for the room and a baffle design. It utilizes the same crossover values. These are meant as an upgrade to the Compact baffles.
The components here are pieces added to the Compact Baffles found on the ABX/Compact baffle page. Please read all the information here to understand how they are used and added to the Compact Baffle plans.
Also instead of the horn/lens you can also use the 360 Degree Radial horn on top of the Compact Baffles. This will give different dispersion, and you can not change the room effects, but the 360 degree horn can be adjusted to load different compression horn drivers differently.
Note: For each level if you are upgrading you can use some speaker components from your previous build in the next step up build. Therefore some or all of the components you currently have can be used in the next build level. This is our way of saving the user money in that they do not have to purchase an entirely new kit to upgrade to the next level.
-

Phase Plugs [pair]
49.00Phase plug -
Horn 1″ with lens and LDA1002 tweeter
797.00Horn -
Horn 1″ with Lens
498.00Speaker -
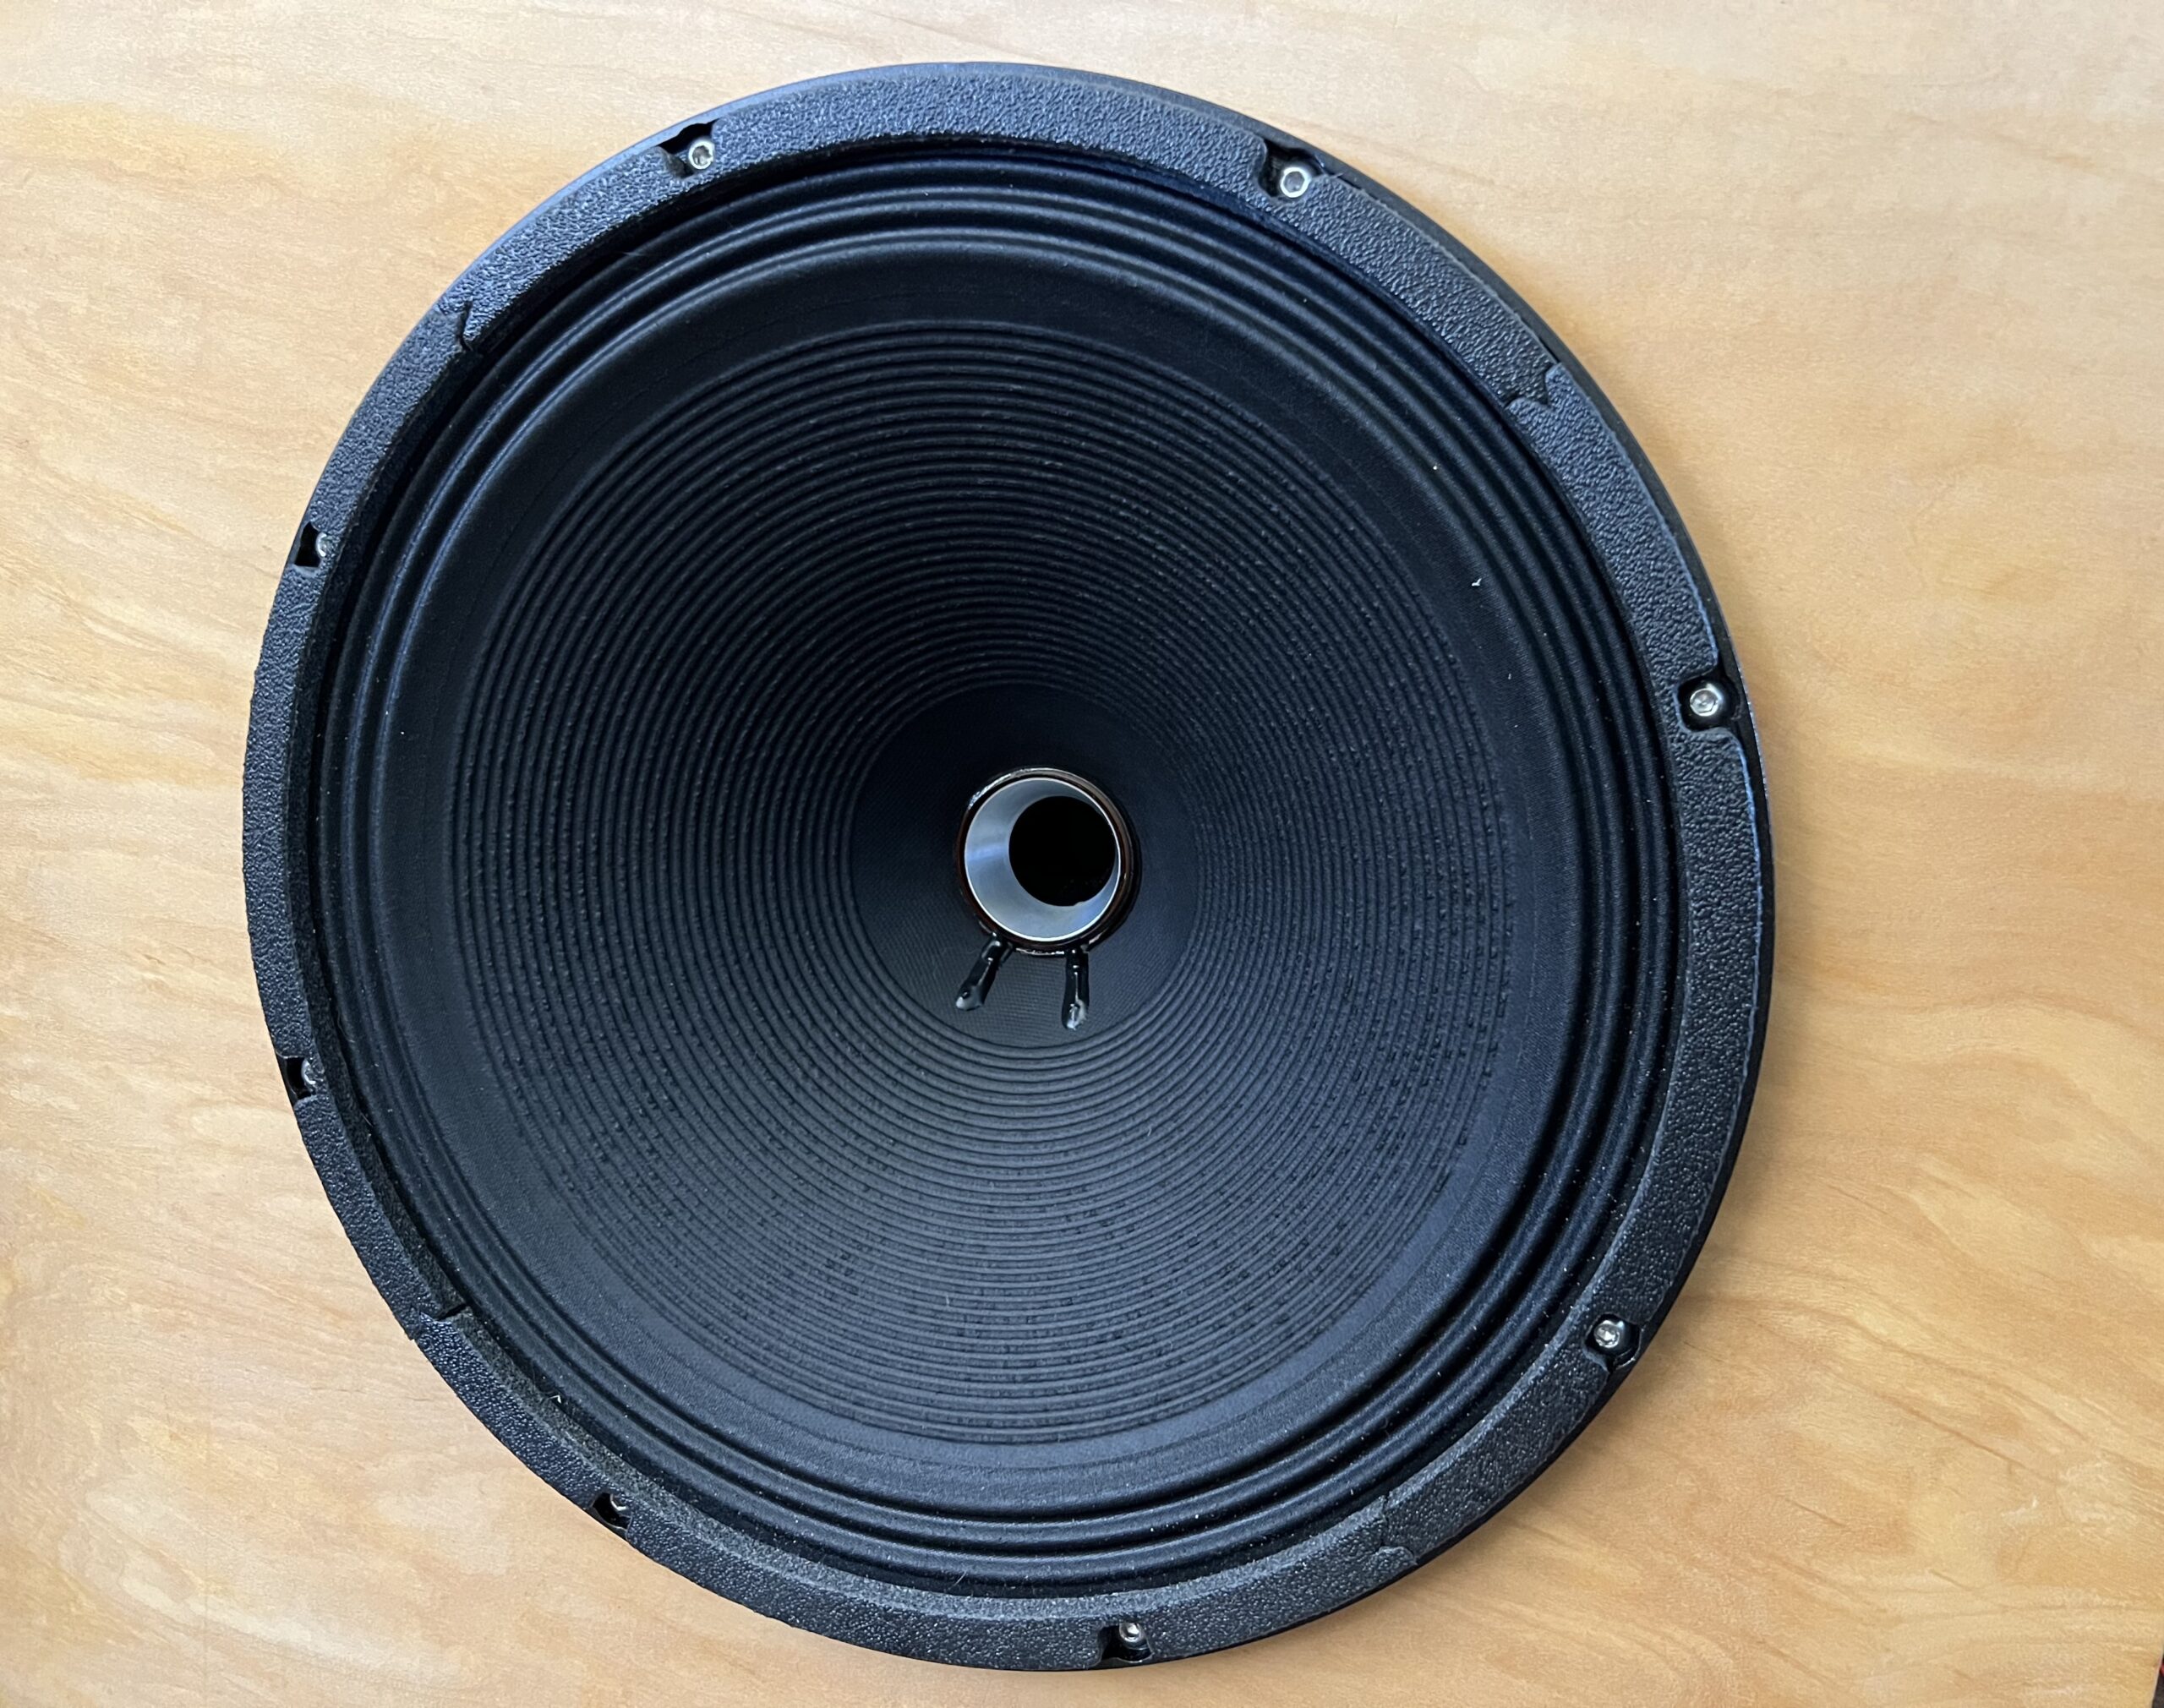
LDA 15″ Coaxial SELECT speaker KIT with LDA1002 tweeters
997.00Woofers -
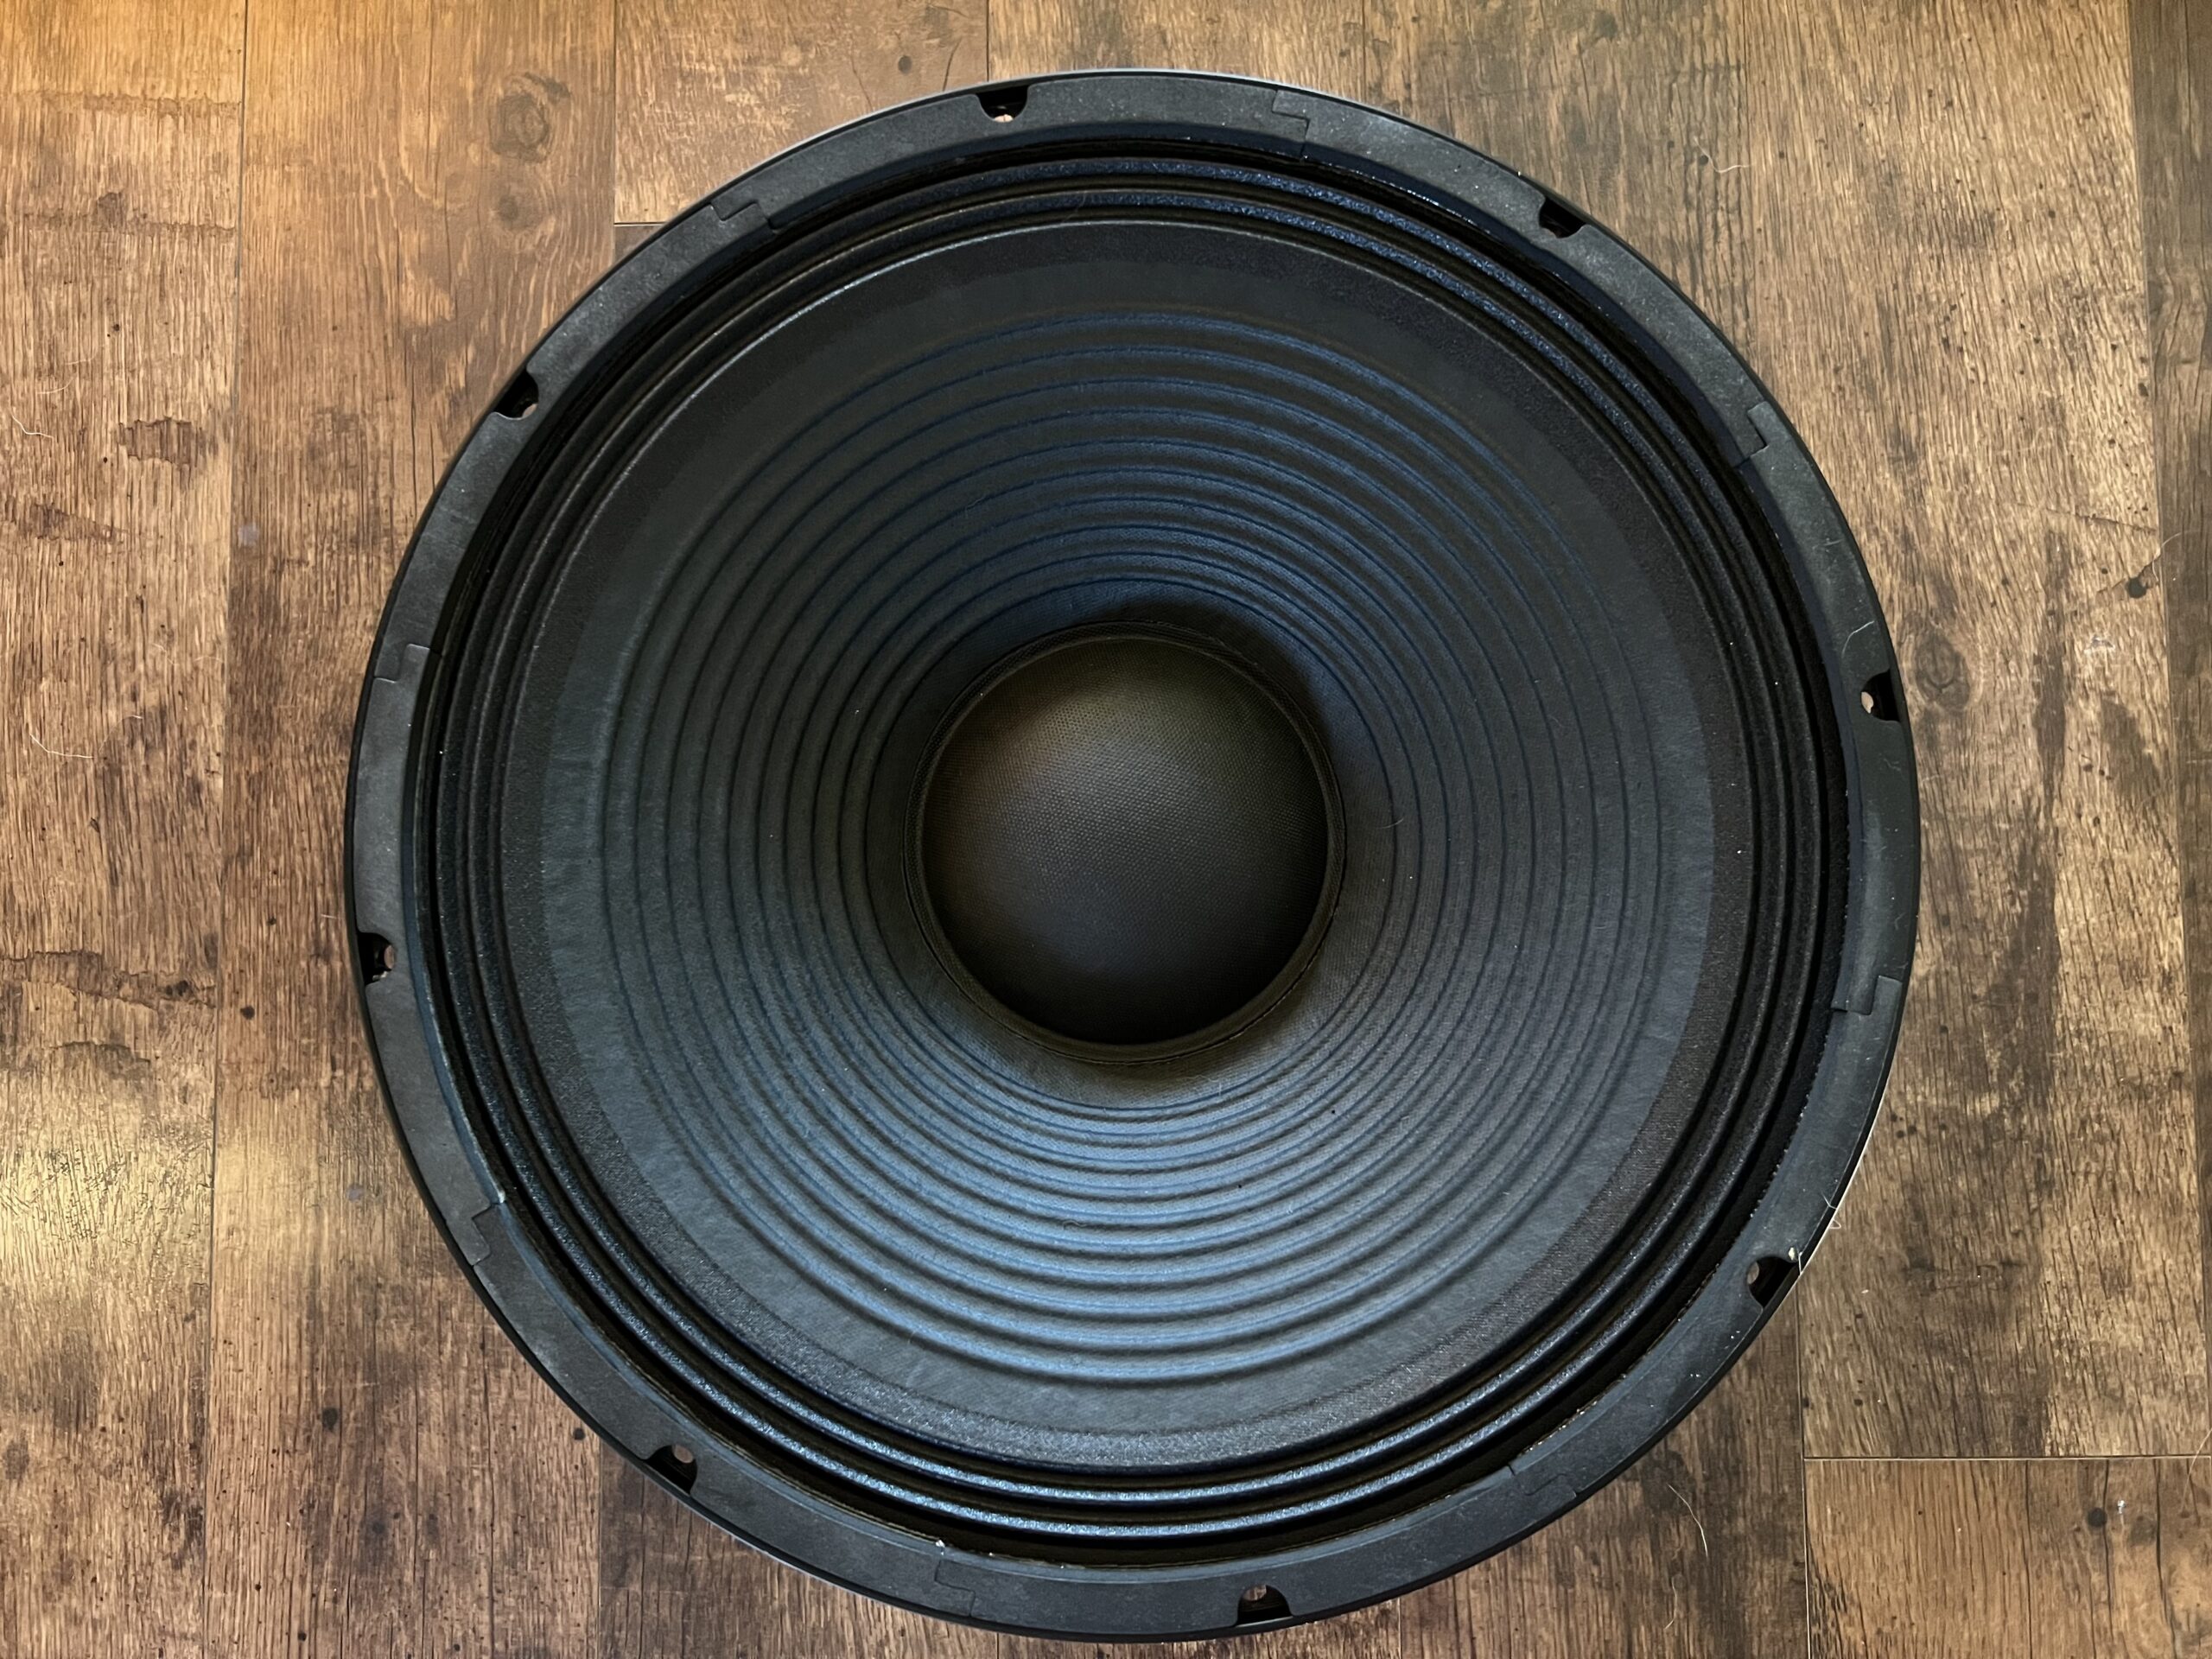
LDA-18 Kit [Pair]
699.00Speaker Kit
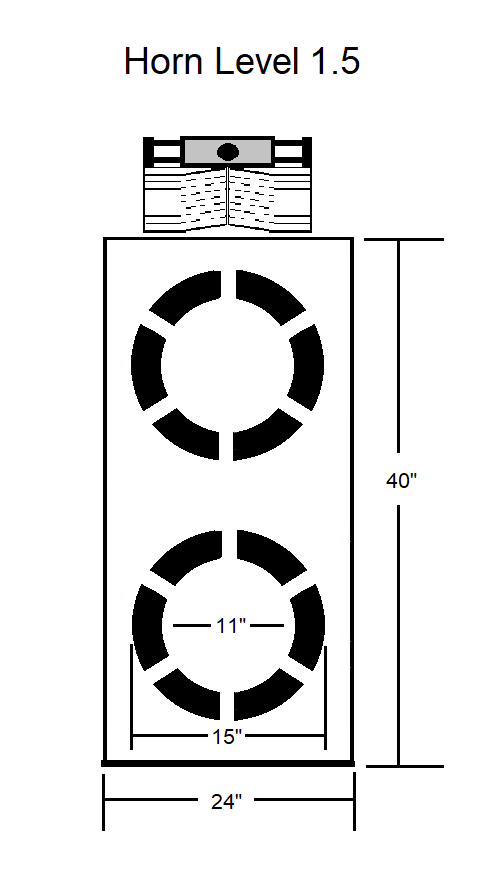
The Horn Level 1.5
The Two Chris’ out of an abundance of enthusiasm waiting to build the HL2 decided to build the HL2 Bass section with the horn/lens from the HL1. So since it is 1/2 way between the two designs I guess we should call it the Horn Level 1.5 (HL1.5), thus it became a thing. The bass baffle can be as narrow as 21″ and wider if you like. Please look at the HL2 plans for more details with this U or H bass baffle.
The crossover for this will be a little different, at this point I am thinking you could use the woofers full range using the slot loading as a 1st order low pass filter, and simply use a cap for the tweeter. Since the sensitivity is very close, depending on the driver used, using the LDA1001, or the LDA1002 would not require any Lpad. This is the simplest horn baffle I think I have ever since with only a single 20uF cap as the crossover.
I would suggest using this just sitting on top as the HL2 bass baffle is designed to work with a top on it. You could also put the tweeter on a stand beside the bass Baffle. This is one of the unintended serendipitous consequences of DIY, people in a group discover stuff. As usual the group is a part of the ABX Audiophile discord. Here is a link
An alternative tweeter could be the LDA 360 degree radial horn which puts sounds in all directions in the horizontal plane equally. This has interesting imaging effects mixing with tube amplifiers, as the images seem to float in space and are very isolated.
https://discord.gg/FjAzBmUeXf
Components
For Horn Level 2
These are LDAs flagship speakers
Description: The design of this open baffle speaker includes two horns, 1)A 360 degree radiating tweeter, and 2)a midrange horn and lens combination. More information and photos of these horns can be found in the links here by clicking view more.
The objective and claim of this flagship design is as immersive of an experience and realism as can possibly be had in home audio. At this point because of limited supply, we are only selling the midrange horn drivers WITH the horn and its lens. This speaker sounds open, airy, real, and shows the full potential of what open baffle speakers can do. A more compact design is being explored to shorten the height of the bass section. And further designs based upon the research of these horns will be coming. Several issues of horn lenses of the past have been address, these are not copies of the original JBL horn lenses found in the 1959 Hartsfield, but are deeper, and are made up of two separate banks that on a baffle can be adjusted effecting the dispersion of the horn/lens radiating pattern.
-

360 Degree Tweeter Horn.
429.00Two, one inch horns for compression drivers. Drivers not included. -

Large 2″ Horn [pair] With Driver, Lens, & Stand
1699.00Horn -
LDA-18 Kit [Pair]
699.00Speaker Kit
Horn Level 2 Hanging Horn Plans
It has been found that the LDA2001(a 2″ driver, not our LDA1002 which is a 1″ driver) Horn and Lens give more sound-stage effects when not mounted in a baffle. Although it can be mounted in a baffle, and sounds very good in one. But out of baffle and open with less obstructions around it, and when it can be a little lower helps a great deal with sound-stage effects. Individuals that have heard this in their own listening rooms have noted sounds coming from all over their room, even behind them on the sound-stage. For this reason we came up with a hanging horn design. Once we develop a method for hanging the horn, and we are working on a few currently, we will either provide the plans or the hanging hardware for this design. It will be adjustable so you can find the acoustic center between the woofers and tweeters compared to the midrange.
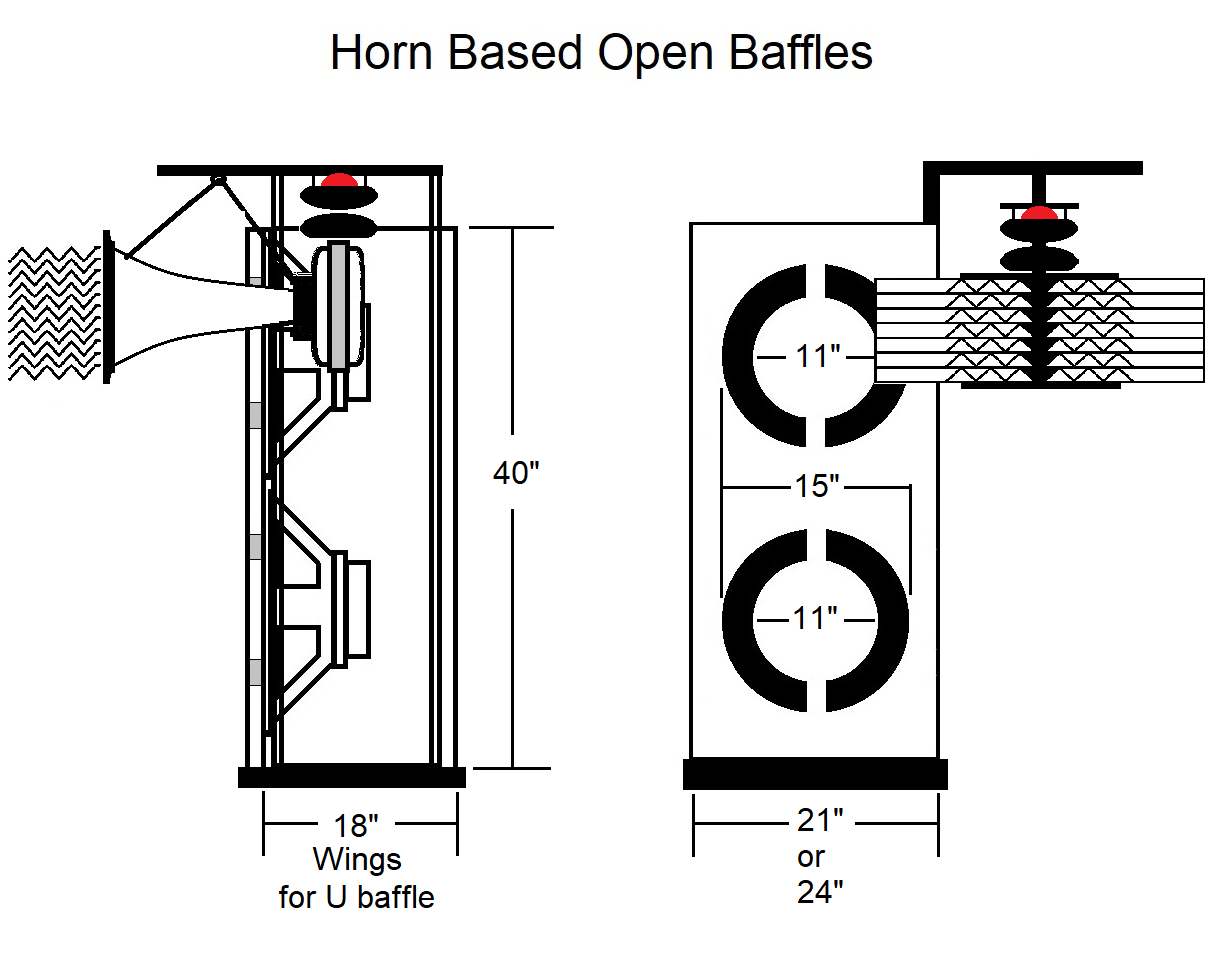
The Horn Level 2 Open Top Plans.
As can be seen the horn in this design sits on top of the bass baffle. The woofers in the bass baffle can be either at the front for an U baffle, or set back and used as an H baffle. The advantage of setting the woofers back a little is to time align the voice coils of the two woofers with the mid-range driver. This gives a smoother response and a little better clarity. The back of the bass baffle is left open to allow the sound to escape for the open baffle dipole effects.
On top sits the mid-range large format horn which comes with a lens and stand, so it can sit on top horizontally as shown. This will allow the horn and its two lens banks to operate essentially baffle-less, and the rear of the horn’s lens projects some sound backward as well The lens should extend beyond the front of the bass baffle section as shown.
Lastly the 360 degree radiating tweeter horn using a LDA1002 tweeter(look in the Products page) is set on a stand straddling the mid-range horn’s driver aligning with its voice coil. How high will depend on personal preference and the room. The tweeter adds very high frequencies acting as a super tweeter in this design to get the sparkle, splash, and “tink” on top adding to details. But its biggest advantage is in the sound-stage and imaging effects it produces.
The horns with lenses allows for a much smaller horn at higher sensitivities with a very flat response. But the largest advantage is the way the lens radiates sound into the room is more like conventional driver.

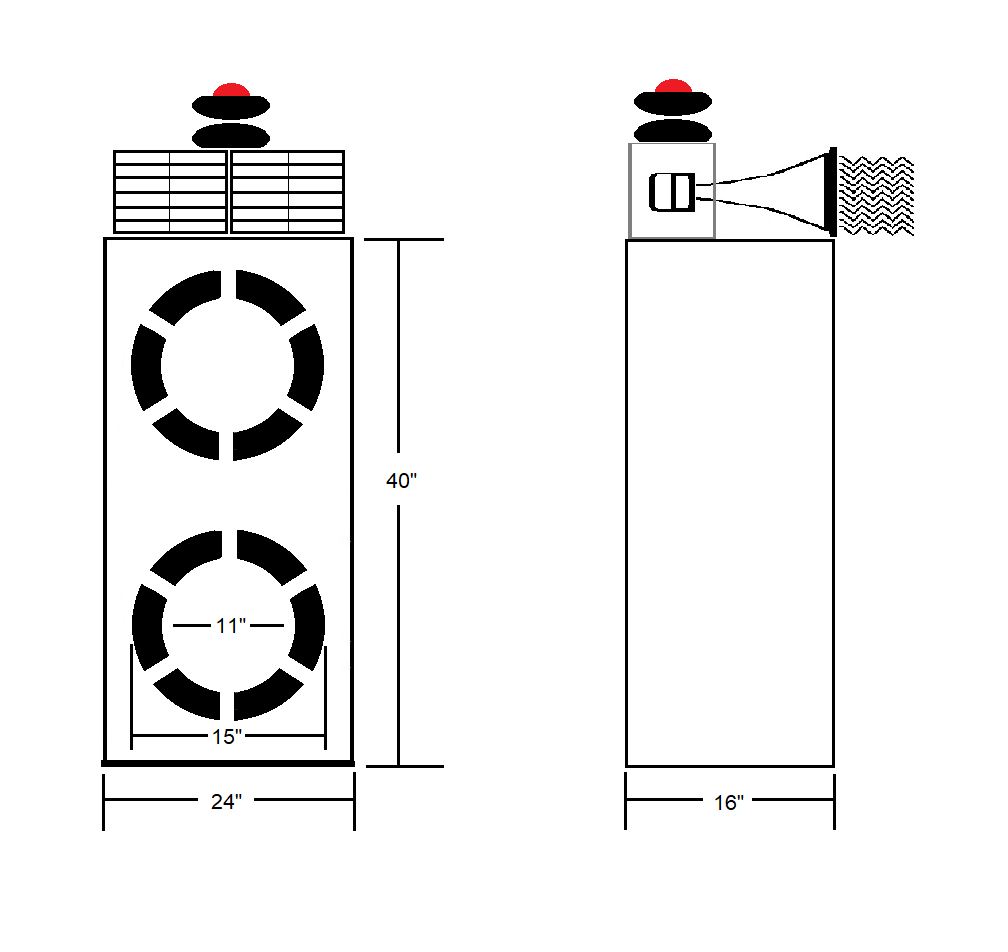
Horn Level 2 Flat Baffle Front design.
These are the easiest of the Horn Level 2 baffles(HL2s) to make, and are much like many of our other baffle designs. They don’t have the same sound-stage and imaging effects when you have the Horn/Lens out of a baffle, but they give so much more than the 15″ coaxial based baffle(we call them the OGs) that they are really on another level of realism and dynamics.
The things that can be variable are the wings, if you want deeper room shaking base use the wings. Also the passive crossover and active crossover can be variable as far as the crossover points, but we suggest keeping with a 1st order crossover slope. The crossover is the same with all the designs. With this design where the horn is in the baffle, another variable is how spread apart the lenses are. The design calls for them 1/4″ a part from the center of the horn. Wider gives less sound-stage and more treble, which you don’t need because of the 360 tweeter. Having the lens banks crossover each other gives more sound-stage, and possibly the images on the sound-stage get bigger.
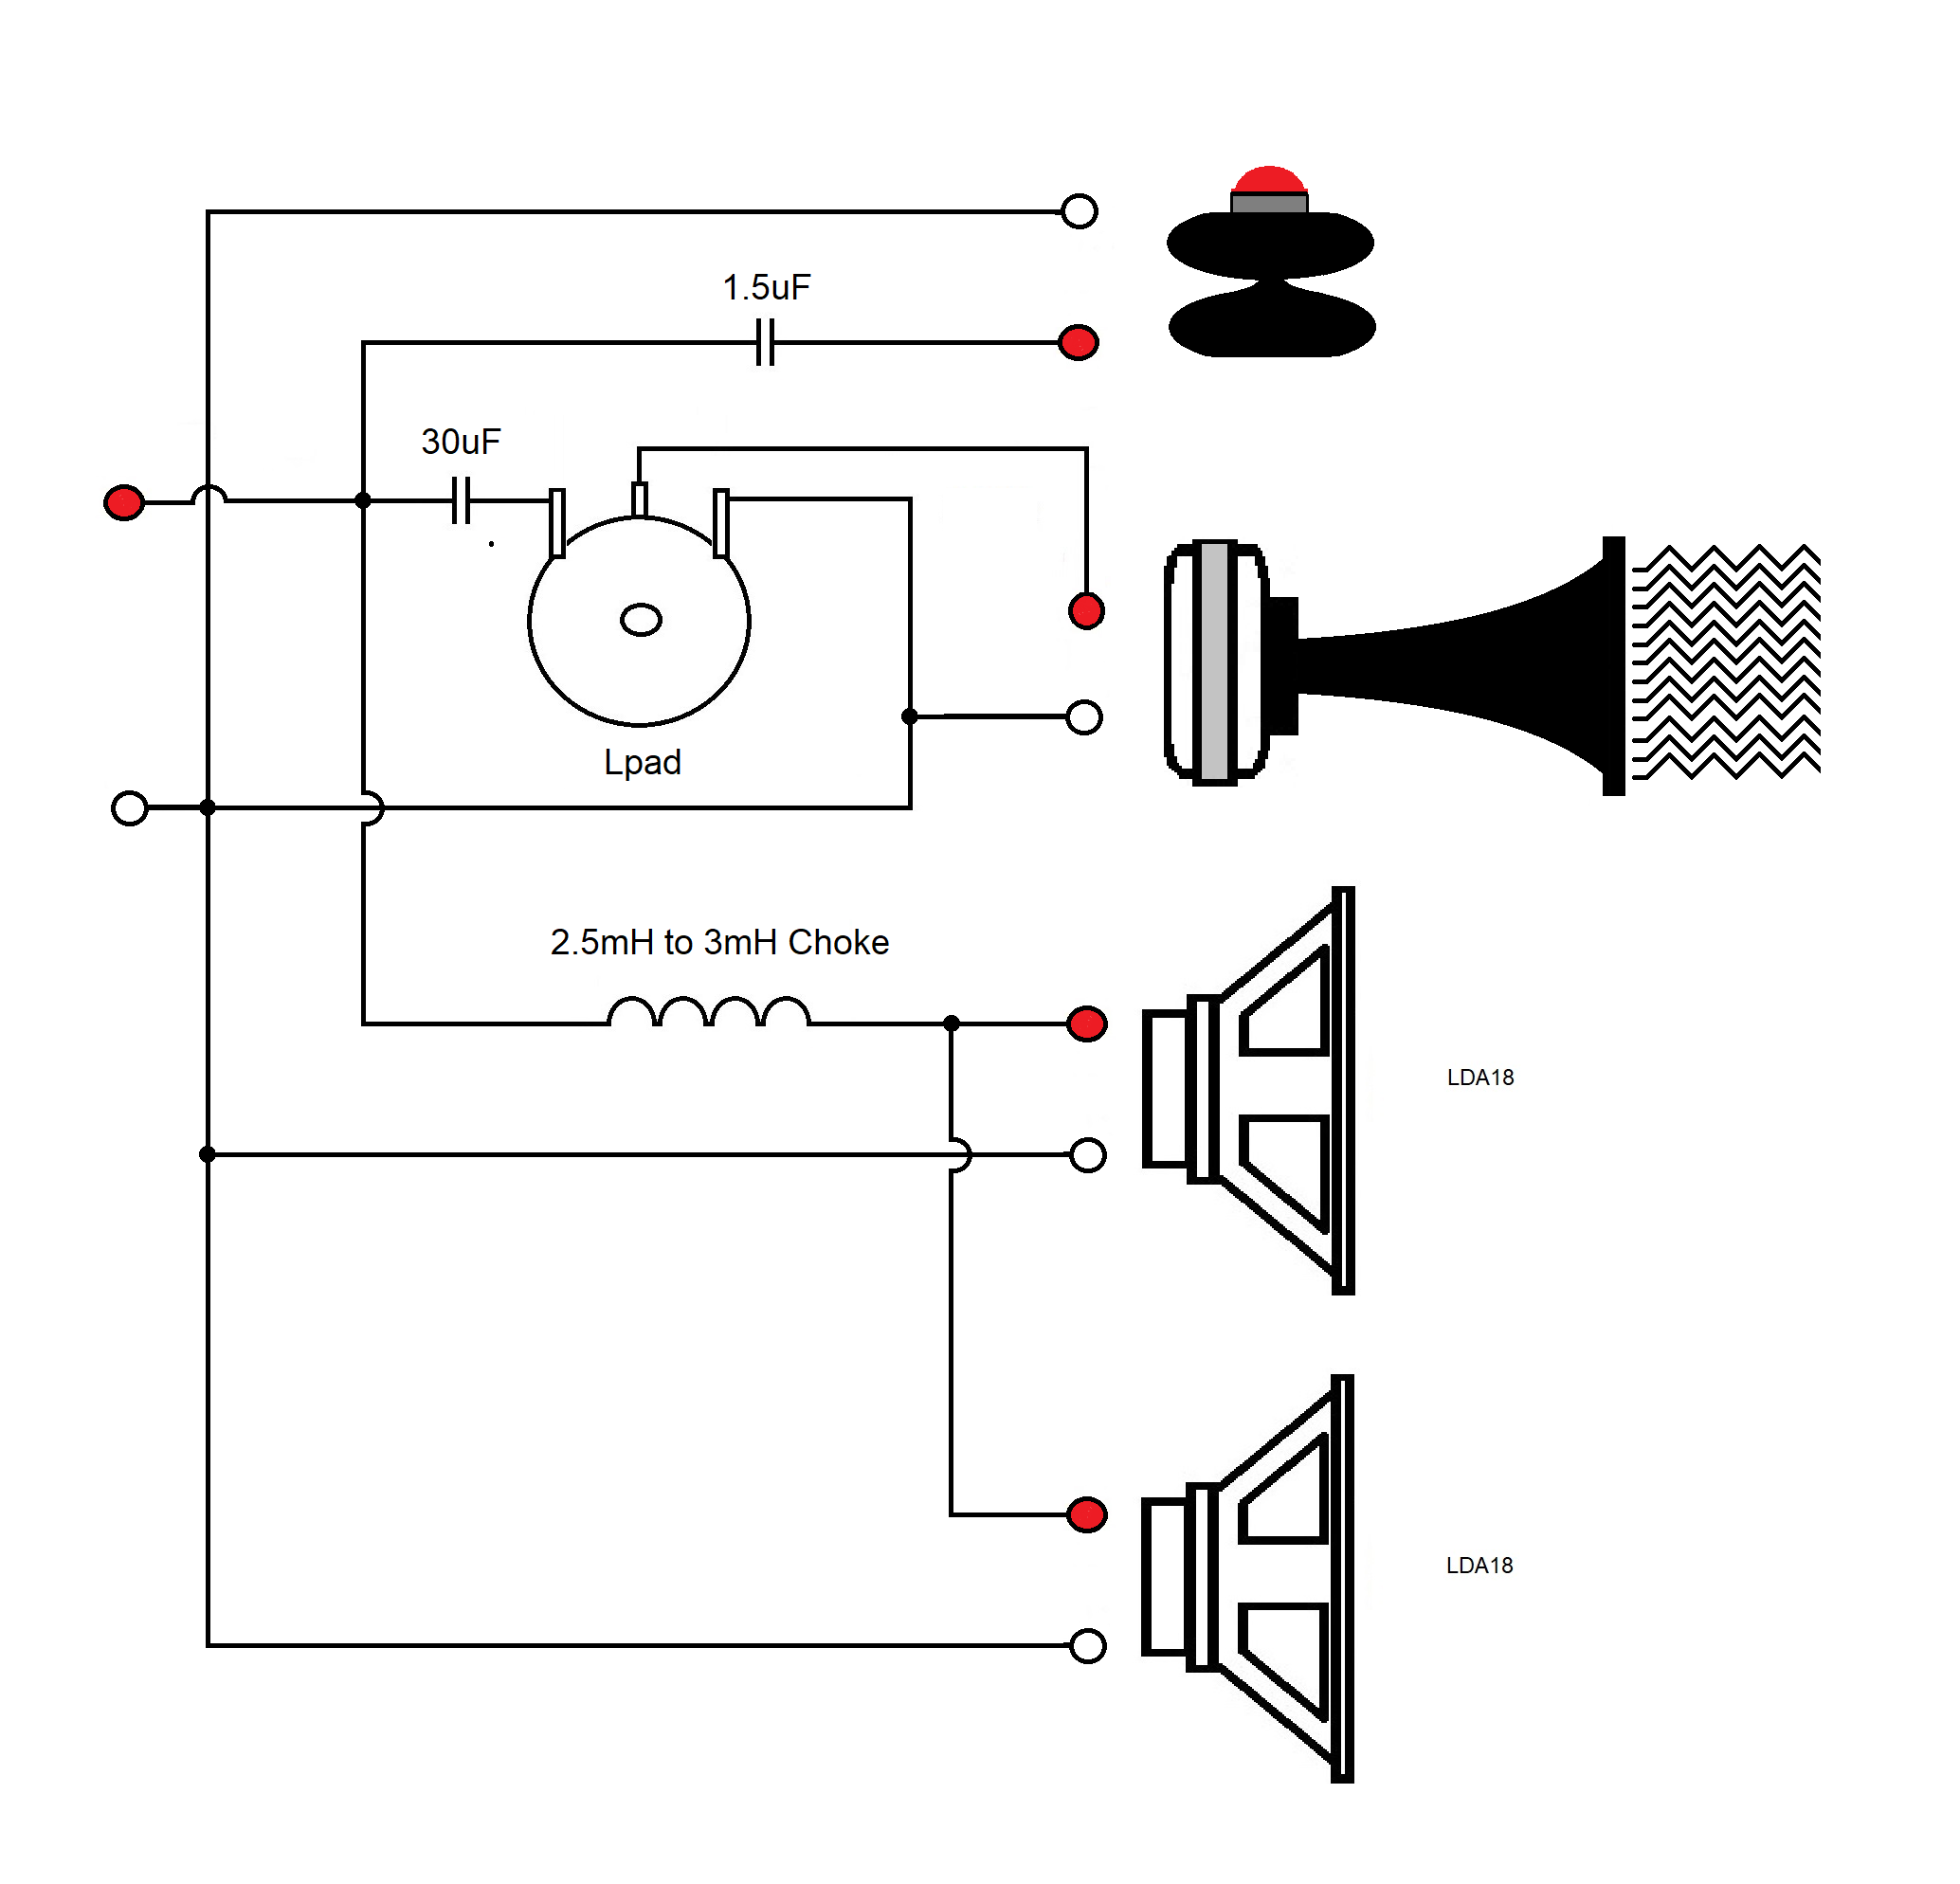
The Crossover.
This is a three way crossover, the dual 18′ drivers are wired in parallel and operate as a 4Ω load for any amplifier. Being that they consume most of the power, the speaker is to be viewed as a 4Ω nominal speaker impedance. A single choke is on the two woofer of 2mH to 3.3mH in size. The largest wire gauge wired chokes should be used we prefer an iron core choke as this allows for as short of wire length as possible for the choke limiting noise and resistance.
The midrange driver can use 30uF or as little as 25uF and as large as 40uF. But note the driver can not handle much wattage above 5w covering the frequencies a 40uF cap will pass through. Therefore a 30uF or smaller cap is suggested down to 20uF.
The 360 degree radial tweeter is to cover frequencies above 10k so a 1.5uF cap is all that is needed ,and a 2.2uF cap will also work, large caps will cause an imbalance in the response as the two drivers start to intermix more than is desired.